Generally, silos are not radio friendly because they are often co-located with high RF noise sources. But the rules permit a 1km radius to work in so you can scout a position which mitigates this interference. Sometimes it works, sometimes not so much.
A recent trip from Canberra to Bathurst took in a list of Silos Starting in Boorowa, then Bendick Murrell, Wattamondara, Noonbinna, Cowra, Holmwood, Bathurst and Kelso.
There are several Silos in my “local” area, Cardiff, Kooragang, Carrington, Moscheto Island and Stroud.
The Hunter Dual Sport Facebook Group offers the following download of maps for Basecamp. The map set is built from the OpenStreetMap source and includes Digital Elevation Model (DEM) data.
Follow the instructions below to download and install the maps set into your Basecamp installation.
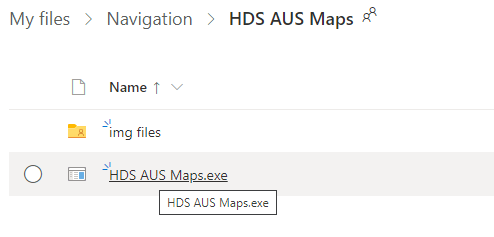
Step 2: Click on HDS AUS Maps.exe to download the initial setup file. Exit Basecamp if you have it open.
Step 3: Run the installation and follow the prompts. Confirm the defaults in the setup unless you are sure you need to change them.
Step 4: Click the “img files” folder to open the folder. You should see all the *.img files listed.
Click the top selector next to Name to select all the files in one step. Then click Download from the top menu and choose to save the files into the default folder created by the installer: C:\Garmin\Maps\HDS AUS Maps
Depending on your operating system or the version of OneDrive you are running, the download may be a .zip file of all the selected .img files. In this case you should locate the .zip file, right click on it and extract all to ‘here’ or the same location. (i.e. C:\Garmin\Maps\HDS AUS Maps). Don’t extract to a new folder ‘img files’, within the HDS AUD Maps folder.
When the extraction is finished, you can delete the .zip file you downloaded to conserve disk space.
Step 5: Open Basecamp and select HDS AUS Maps form the drop down menu selector or the Maps Menu.
The planned route included overnight stops in Wingham and Dorrigo, intending to cover as much off-road ground as possible. Fortunately, good weather prevailed for the 3 day ride, the stopover and the one day return.
We lost one rider on Day 1, at the northern end of Settlers Road near Bucketty with possible broken ribs. A near broken toe on someone else but the show went on.
Highlights of the second day were Toms Creek Road, the run through Ballengarra State Forest and the run up Blairs Road north of Missabotti
Highlights of the third day were the Giant Tallowwood north of Dorrigo, the run through Nymboi-Binderay National Park and the run from Whiporie to Bungawalbyn
Toms Creek Road
Legend:
red line as recorded track,
Route Plan Wingham to Dorrigo
Destination
Distance
Arrive
Depart
Wingham
Puma – South Kempsey
166
12:30pm
Willawarrin – Lunch
53
1:14pm
1:45pm
Bowraville
58
3:06pm
Blairs Road
16
3:20pm
Dorrigo
53
4:25pm
Total
346
Route Plan Dorrigo to evans Heads
Destination
Distance
Arrive
Depart
Dorrigo
8:46am
Giant Tallowwood
20
9:12am
Lowanna
24
9:59am
Nymboi-Binderay NP
22
10:20am
Coutts Crossing – Lunch
45
11:18am
12:25pm
Grafton
20
12:40pm
Whiporie
74
1:30pm
Evans Head
63
3:00pm
Total
268
HIGHLIGHTS
Bridge in Ballengarra State Forest
Toms Creek Road is a favourite. A beautiful view from the south as you negotiate the switchbacks down into the valley and then a fast run to the north.
Blairs road is only about 3km long but climbs over 250m. The track is quite twisty and has a lot of pronounced erosion mounds making it difficult not to jump. On this day the track had been recently graded and was smooth and fast.
We raced past the giant tallowwood north of Dorrigo so if you weren’t quick to look up to the right as you passed, you missed it.
The track through Ballengarra State Forest was in good condition and finished with a tricky little log bridge.
The track north from Whiporie was most straight and flat so it good practice for some high speed bends.
Sadly a baby whale washed up overnight on Evans Head Beach, Cause of death was unknown.
are a few. They all have their own benefits and shortcomings. But put them together and they deliver reasonable confidence when deciding where to go and how to get there.
When it comes to actually navigating, there’s only one tool I find is up to the task. That’s Locus Maps.
I’ve recently paid for and tried the HEMA Explorer App and I can see now why I previously considered it lacking. I’ll try to explain why here. Both apps provide offline map solutions
Locus Maps – Maps
Locus Maps are vector maps built periodically on Open Street Maps (OSM) sources. If you contribute to OSM, then your edits will appear in Locus Maps which are updated about 3-4 times a year.
Vector maps are relatively small and scaleable (almost infinitely). My NSW, VIC and TAS total 562Mb.
HEMA Maps – Maps
HEMA maps, on the other hand are raster maps which are basically bitmap images of their map at a fixed resolution so what you see at zoom level 1 is identical to what you see at zoom level 14.8. My NSW, VIC and TAS map tiles are 1.3Gb This is more than twice the size of the vector content with a lot less detail.
At the maximum zoom level, the image is at it’s limit and appears to be pixelating. From this point you have a choice, work at this maximum resolution or pay an additional fee to get 2 more zoom levels (zoom level 16). You are then able to zoom more before the same pixelation effect but it is still no where near as good as the vector map alternative.
Vector Vs Raster
Zoom comparison, from maximum of HEMA to huge in Locus. 1km becomes 100m
Some people actually like the fact that no matter what zoom level you are using, the map detail remains identical. Using vector maps, the more you zoom in, the more detail is revealed. So much detail can be stored in vector maps that it would be impossible to show all the detail in the largest view size, it would be so cluttered that you wouldn’t see anything clearly. But some people get annoyed that they are forced to zoom right in to see things not visible at the larger sizes. I enjoy the process of revealing detail and appreciate the benefits this setup brings. Each to their own.
I certainly don’t like the file sizes of the Raster Maps. They are huge and because of that, they are slow to use. If you want to the improved scale from HEMA you are advised to download only the tiles you need and not the whole map area.
I have had the offline Locus Maps for Australia, Japan and South America on my phone simultaneously with no problem.
Costs
Locus Maps costs €9.99 compared with AU$49.99 for HEMA Explorer.
The maps for Locus are very cheap – Locus works in LoCoins, so to put some scale to a purchase/update, an update for New South Wales maps is 30 LoCoins (@200 LoCoins for €2) the purchase is about AU$0.45c.
HEMA, on the other hand, wants another AU$49.99 to upgrade to Pro for the improved maps or AU$9.99 per month.
Scale
The standard HEMA maps provide 1:150,000 scale with the Pro version improving this to 1:10,000. They refer to this as ‘unprecedented’. The Locus maps are 1:2,500 scale which is 4 times better than the ‘unprecedented’ HEMA equivalent.
Useability
Locus provides a customisable navigation interface which includes a ‘dashboard’ overlay if you wish. But a feature I really appreciate is the auto zooming while you move. As you move faster, the maps zoom out for a larger view so you can see the track turns well in advance. As you slow down, the map zooms in for more detail.
HEMA has no such feature set. Its stays on one zoom level. You have to stop and fiddle with the zoom and orientation when you need to check things.
I found Stanley to be a little too ‘twee’ for my liking. A few too many ‘Ye Olde Coffee Shoppee’s if you know what I mean. But the coastline was nice and the run through Lake Chisholm and the old forest areas and sink holes was very pleasant.
The landscape changed dramatically moving west to Coutta Rocks. Tall trees vanished, replaced by low windswept vegetation. On the plus side, the lack of trees provided unhindered views over large distances for most of the road south to the Pie River at Corinna.
Strahan
Strahan, on the other hand, was very pleasant. Old world architecture without being ‘over-cooked’ Quite colourful. The only downside in my mind was that Strahan is associated with the company – Tassal which has a reputation for being very aggressive with their demands on the environment and aquaculture in Macquarie Harbour. They probably invest heavily in the local area to compensate for their misdeeds.
Bruny Island
Looking east from Bruny Island Lighthouse
The day trip to Bruny Island was quite special. Fantastic views east and west form the lighthouse
Cockle Creek
Cockle Creek
Weldborough
Weldborough Hotel
I found a stunning little hotel for a pub stay in Weldborough. Currently doing well as a meal and camping stopover for the thriving MTB tourists to the area, the hotel is otherwise quite isolated. It has excellent food, a great atmosphere, good rooms and for $50 a single, is excellent value.
The old hotel building has some great history too. The area originally developed around the discovery of tin and the community comprised mainly of Chinese workers who couldn’t do without there majong gambling. So the hotel is known for being the first (unofficial) casino in Tasmania. There are photos of guards standing outside with shotguns protecting the door from unwanted visits from law enforcement officers.
Sir Frederick Weld was Governor of Tasmania from 1875-1880 and known as a pioneer of development of the wilder areas of Tasmania.
Cautions
Logging Trucks
There are quite a few roads (gravel) marked on the HEMA maps I use, as ‘Access Restricted’ and ‘Weekend Use Only’. At first I thought this was a National Parks restriction and when I asked a local service station operator, he confirmed my interpretation but I now think differently. Logging is not as ‘dead’ as we might think in Tasmania. Frequent road signage argues the case for ongoing sustainable forestry activity. So, on one of these ‘restricted access’ tracks I came head-on with a logging truck doing at least 80-90kph. There’s very little room to escape these behemoths. If I’d been driving a car I would have ended up in a tree. As it was I just managed to squeeze along the soft gravel verge, narrowly missing the end of the log trailer.
So please watch out for logging trucks and always keep an eye on an escape line.
Accommodation
A combination of Camping (4 nights) and Pub stays (4 nights) made for a good balance of economy and comfort. Some pubs offer free laundry facilities which saves at least $13 for a load of washing. Staying 2 nights in places used as a ‘base’ for day travel was also a good option because it saves the inconvenience of making and braking camp frequently.
Keith River Road was blocked by a fallen tree (see attached) and then a washed out bridge. Whilst both would be navigable by small bike or in a group, a solo ride made turning back the preferred option.
Keith River Rd was spelled incorrectly in OSM and has been corrected.
Next Time
Because of the fires, the road to Strathgordon was closed. Access to Styx Road was also denied. So I’d like to see these tracks next time.
I’d also like another attempt at Dove Lake and Ben Lomond. A visit to these destinations is weather dependent.
Stats
Planned: 2000kms, Actual 1925kms
Ambient Temp
8-31C
Max Engine Temp
137C (at front rocker cover)
Road Conditions
a few days or rain but all roads were in very good condition (both gravel and asphalt). I was surprised at how good the gravel roads were.
I have ridden all the metaMotoADV rides documented on this website. So the degree of difficulty of each ride should be measured against my ability and the only way for that to make sense to anyone is to understand at least a little about my riding history and experience. I will try my best not to over or understate this experience here.
I will use 3 dimensions to describe my riding experience:
Distance traveled
Balance of road surface ridden
Personal likes and dislikes
Mileage
As of the beginning of 2019, I have about 8,000kms or off-road riding experience.
on Versus off-road
I started my motorcycle history on a Honda CB250. After one year, I moved onto a Ducati 900. I rode this bike for 2 years before selling it. In 2016, after 38 years without a bike, I purchased a Suzuki DR650 . So most of my experience until 2016 is old and it’s on-road. I did, however, have some minor experience on a Montessa trials bike during this early period.
Since buying the DR, I have ridden 16,000km and at least 50% of this has been on gravel roads. The tracks and ride reports stand as evidence of where I prefer to ride and should be assessed by you, the reader, in terms of my DR650’s ability.
Enfield Range Road NSW- Level 1
Likes and dislikes
I often prefer to ride alone and travel at my own pace. I stop when i like, for photos, and like not being driven by another rider’s pace. But I also like riding in company when the trip is reasonably well planned and I have some idea of what to expect. It also helps when you ride together with someone of similar ability when the degree of difficulty is higher or the track is more remote.
I dislike group rides which seem to focus on speed and distance without thought to the overall geography and location. In my experience, organised group rides, where the group is made up of people who are not familiar with one another, tend to fall into this category.
Conclusion – degree of difficulty
Based on this experience, I classify a track’s degree of difficulty on a scale from 1-3 as follows:
Easier tracks suitable for beginners and or heavier bikes. Typically “commodore” type roads or at least well trafficked. Suitable for 2WD vehicles in most places,
Challenging tracks with some element of single trail or features more associated with a need for 4WD vehicles, and
Tracks which are better suited to lighter bikes or to be tackled only in the company of fellow riders able to assist. They may also be isolated from regular traffic and introduce a safety concern for solo riders.
I have no issue approaching level 1 and 2 tracks as a solo rider in most cases. I avoid some level 2 tracks and all level 3 tracks when I am riding solo.
Safety
I always carry a comprehensive first aid kit and a kti PLB. I used to have a SPOT device but consider this hardware marketed more toward our need for using social media. It’s costly to operate and its more popular features are offered elsewhere for free (e.g. Spotwalla and the Bubbler GPS App). The Australian made kti unit is registered with Australian Maritime Safety Authority (instead of a commercial enterprise) which gives me piece of mind.
That said, I always consider that my use of the beacon will most likely be for the assistance of someone else, not me. And I always hope that someone else will be able to use theirs or mine to help me. I restrict my solo travels, as much as possible, to reasonably well trafficked roads with a lower degree of difficulty. I’m aware that sometimes it’s not until after a ride that you realise the safety risks were higher than you expected.
The only next step to being more able to communicate in remote areas would be a Garmin InReach device. I have not gone down this path yet.
The inaugural adventure Wall to Wall 2017 motorcycle ride was initiated by Dave Darcy. Dave wanted to create an alternative ride for adventure motorcycles to compliment the road bikes of the traditional remembrance ride. He asked RideADV to manage it.
Dave Darcy has a great YouTube channel with lots of exciting content on rides and motorcycle reviews. He’s probably best known for his London to Sydney ride some years ago on his KTM690.
The tracks were fantastic, as usual, and well researched by RideADV. A great way to see the towns of Gulgong, Wellington, Molong, Parkes, Eugowra, Gooloogong, Koorawatha, Murringo, Boorowa and Yass even if most were just fleeting visits.
A 4 day/3 night ride, we stayed in Gulgong, Parkes and Yass in Motels.
It was good to know the support vehicle was always on your tail.
For people who could get there, the ride formally started at The Domain in Sydney. Riders were escorted out of Sydney by Police motorcycle and joined the road west to Lithgow. A formal stop was scheduled at Capertee where other riders joined in. From Capertee to Gulgong, the ride was navigated by markers. From Gulgong the ride as a navigation ride and riders kept to small groups of roughly equal riding ability.
Each day had a standard route and at least one breakout section but I think everyone on this ride took the breakout sections as of they were standard.
The GPX file download above is there for anyone who wants to see exactly where we went.
Incidents
There were a few dropped bikes along the way including mine. But no serious injuries were reported.
Memorial
It was good to be able to join all the other motorcycles at EPIC in Canberra and be a part of thousands of people attending the annual ceremony at the National Police Memorial. A sombre event, and one which highlights the risk to policing and the ultimate sacrifice made by some members of the force.
“The Scrapheap Adventure Ride is a unique fundraising event which involves motorcycle enthusiasts from all over the country purchasing a bike for no more than $1000 and doing it up for an adventure ride through the Aussie outback, all while raising money for people with Down syndrome.”
Great tracks and a great bunch of people, with all bikes welcome.
This year (2019) will be a run to northern NSW – the Byron Bay hinterland. Looking forward to it.
Join a team or just enter and join us at the start point.
GPS Navigation has taken off in recent times and the further afield I travel the more inclined I am to have paper maps as a backup to my GPS navigator. I’ve concluded that there is NO single source of information I can trust in exclusion of all others. They can each contribute to the final solution on route choices. I’ll leave the pre-running exercise to the professional support/ride companies – they have to afford that. I have to decide where to go from my desktop – before I leave.
Paper Maps
I have HEMA maps of each state and a couple of smaller areas e.g. Flinders Rangers as well as South Australia. I also have the HEMA Australian Road & 4WD Easy Read Atlas. The atlas would be impossible for me to take along on a ride – it’s too big and heavy. But these maps do a good job of indicating the extent of differing road surfaces.
OpenStreetMaps (OSM)
My navigation software uses OpenStreetMaps as its source even though updates are only done about 3-4 times a year. But I can maintain a more up-to-date mapping environment in Basecamp with my own version of OSM maps.
GPS Navigation
I used to use a Garmin GPS device on the bike. It unfortunately proved unreliable (random re-boots) and my model did not support tracks and was not water proof. It only accepted routes. Typically, routes end up constantly re-calculating which is not what you want. A track is locked down and fixed. You are either on it or not which is what you want.
So I found 2 things which made using my already waterproof phone a sensible idea.
The choice of navigation software is a personal thing. We discover and invest time in a solution and get happy with it. We don’t have time to go through this process with every alternative on the market. But I can highly recommend Locus. There’s a lot of good features and it’s never let me down and there’s a lot of good support.
Locus Maps is all offline (it even uses BRouter offline router for re-routing), it can show track gradients, it syncs really easily with Basecamp via a dropbox account or similar, it records your tracks, and much more.
SP Connect has RAM mounts and I use a long arm to get the phone nice and high just under the top of the windscreen.
QuadLock (Australian Company) now also have RAM mounts – they didn’t when I chose SP Connect.
One day there will be a good and affordable heads-up display for our helmets but for now they’re pretty expensive and pretty clunky.
The tools I use for planning and mapping trips are:
Garmin Basecamp (v4.7) (Download Basecamp 4.7.x [EDIT] I now use the latest Basecamp because Google Earth has stopped the server side operation of sending tracks to Google Earth.
From version 4.7.0 of Basecamp, the View|Google Earth menu option is not available. It’s still possible to view your tracks and routes in Google Earth from version 4.7 but it requires extra steps of exporting them from Basecamp and then opening them in Google Earth. It’s a lot easier to just select a route and view the route in Google Earth with version 4.6.2 so my advice is just stick to this version. The View|Google Earth menu option starts up Google Earth, if it is not running, and sends the route across in one operation. When you close Google Earth, you can choose to just discard the route or save it in ‘My Places’ if you wish. I just discard because it’s already saved in Basecamp.
When using Basecamp 4.6.2, you must have the 32 bit version of Google Earth in order to use the above feature. The 64bit version does not respond to the requests to open and receive a route automatically. I am not aware of how the mac version behaves. If it fails to open the route then I have no suggestions as to a fix, sorry.
Basecamp is my main planning and mapping tool. It’s the way I visualise the route, record it, file it, play what-ifs, and use it to send the final versions to my phone or navigator.
OpenStreetMaps – Mapping
I like to support the open source effort in software development and the mapping environment is no exception. The tools are readily available and easy to use for those who wish to contribute to correcting and adding details to OSM in this way.
The maps I use are based on OpenStreetMaps and built from the geofabrik source map for Australia. This is an automatic build of the OpenStreetMaps for Australia which is refreshed almost every night. So if you make a correction or add a track today, your work will be visible to you and everyone else within 48 hours of saving the changes.
It’s very easy to open an account at OpenStreetMaps and the online tools, once logged on, are very simple to use. For NSW, we are lucky that NSW State Government Department of Lands and Property Information (LPI) has provided their maps as a layer for OpenStreetMaps. It’s a good authority. Hopefully one day other states will follow this lead.
Map Uploader – Mapping
This is an advanced topic. To create working maps to use in Basecamp, you need to do a lot of data processing. There may be other ways to do this but I have chosen to use www.pinns.co.uk MapUploader software. I process the geofabrik .pbf file using MapUploader and I use my own .TYP file for processing the maps which can be edited with pinns TYPWiz. A TYP file is a file describing what colours you want things to be drawn in, how thick you want the lines etc.
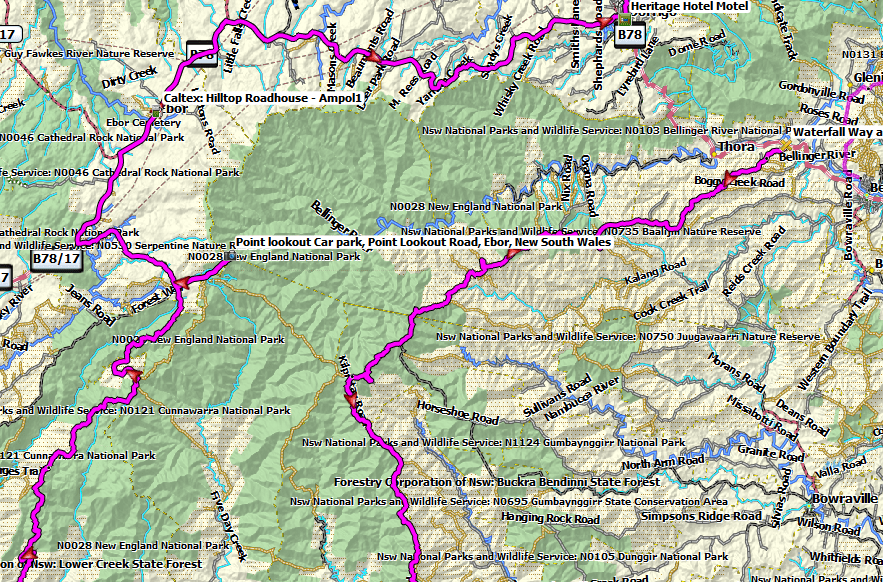
I also use the contours and the digital elevation model (DEM) data settings when making my maps which provides a lot of help when assessing my routes. You need to download the DEM data separately as a once off process to be able to always include this in the maps you make for your region. When I generate my maps for Basecamp, I process the whole country but it’s also possible to do a single state. I’ve also processed South America continent and Japan for trips I’ve made there.
The maps for Australia are about 3Gb in total when generated for Basecamp. Not something you can email but I am happy to send them on a USB stick if you send me one. I can also generate a BaseCamp Map Installer to make the installation easier.
Google Maps
Google Maps is the best way to review 3D imagery of the country when you lay the map over. The web version of the 3D view is better than Google Earth. Streetview is also good to check road surface and the extent of sealed roads. Not all roads have Streetview imagery.
Between all these tools you end up working thru a lot of issues prior to departure. Sometime I end up knowing the route so well before I leave I hardly have to consult my GPS or maps. But I do take paper maps with me when I go just in case I need a large view on any alternative routes I might need to use.
The blue line of Streetview can give you a lot of confidence that the road is well used. When your tracks runs off the blue line it’s nice to see the intersection.
Google Maps and Steetview are essential tools for making an assessment about degrees of difficulty.
Seeing the quality of road at the intersection can give you a good idea of how much the road is used by local traffic. No guarantees for what lies ahead. Aerial views of your track from there is the best you can do.
Google Earth
Checking your planned route in Google Earth is simple. Export your track(s) from Basecamp as KML files and open them in Google Earth.
Seeing your route from satellite view can sometimes confirm your suspicions very quickly. If a Streetview has been taken of the road, you should consider this a very easy road. So if the blue line is there when you drag the little man across, it’s easy.
NSW LPI Basemap and Google Earth
The NSW Land and Property Information Department (recently subsumed into another department), has very good survey information of all gazetted roads in NSW. They publish this information in various forms so third parties can use it. HEMA accesses this data as an overlay. So too does Australian Topo Maps (an android phone application). It is also available as a basemap for Google Earth. Six Maps is the Department’s publication tool. The NSW background basemap is this same layer.
The download above can be opened (or switched on) in Google Earth while you inspect your routes to see if your plan is following gazetted tracks.
Paper Maps
HEMA paper maps are my choice. But Forestry Corporation Maps can provide additional clarification. As always, more sources of information provide more opportunity for conflict.
I always have my HEMA Atlas open when I work with Basecamp. I take the relevant state HEMA map(s) with me when I go.
HEMA Explorer Cloud
HEMA Maps are well known and very popular in the 4WD and adventure motorcycle world. They sell paper maps, navigation devices and electronic versions of their maps. They also provide these electronic maps on a subscription basis and the more you pay, the higher the resolution maps you can get. There is a comparison between HEMA used in navigation and Locus Maps here.
The HEMA Cloud website where you can access most of HEMA’s map resources online


 A recent trip from Canberra to Bathurst took in a list of Silos Starting in Boorowa, then Bendick Murrell, Wattamondara, Noonbinna, Cowra, Holmwood, Bathurst and Kelso.