
The scanning process has been the most frustrating aspect of my workflow. It’s not just a matter of buying a scanner and clicking the scan button. The permutations surrounding the available scanner controls is already enormous. The variety of opinions found on the internet as to what settings to use and the sequence of workflow is overwhelming.
I couldn’t find a second hand or refurbished scanner, certainly not in a price range that suggested a saving over a brand new one, so I have purchased a new Epson Perfection V800 scanner. I did this before I spend any money on outsourcing any scanning and I’m hoping that I will never need to pay for a drum scan for the workflow I want to concentrate on. I see myself only ever wanting to print 20×30″ prints from scans of my 4×5″ negatives/transparencies.
The film holders for the scanner have four height adjusters. I’ve tried the minimum, maximum and central position. I cannot tell any difference. Someone has said the scanner actually has focus adjustment, some have said the scanner has autofocus. Page 16 of this paper at Luminous Landscape has argued for different heights for different media. Again, I cannot tell any difference at all.
The scanner came with Epson Scan software as well as SilverFast 8.0 SE. So that was the first choice. I tested and tested and tested some more, based on all the youtube videos I could find. I’ve concluded that Silverfast is my choice. The settings for the software are documented here.  Firstly, I choose Transparency (some people even use Reflective for their negatives – I can’t see the reasoning). Then I choose Negative which provides the NegaFix dialog – see below. I select 48-24bit colour even though I am using B&W negatives, why? Well, if I were going only as far as the scan output, I would choose 16-8bit B&W, but since my workflow continues into Lightroom, I am convinced by others that it’s best to start the next step with as much information in the scan as possible. So I select colour output. I can select ‘Slide 4×5″ Holder for Frame but someone has commented that the standard frame includes areas outside the negative exposure and this effects the scan exposure. So it’s probably better to use Custom frame and make sure the red frame line is actually fully on the negative. This results in input dimensions for the frame at about 4.63 x 3.59″. We can’t expose the full 4×5″ film negative since some of it is hidden behind the film holder guides.
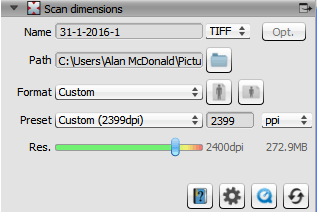
I spent a lot of time on the Scan dimensions. Bottom line: TIFF is lossless compression so if you continue on into LR or PS etc, you need to continue with all the scan information and not a subset of it like JPG. There is strong debate over whether the scanner can really deliver 6400. It actually allows selection of 12800ppi. But 6400ppi creates a file size of approx 1Gb. This might be good but it really slows down Lightroom during development. Finally, there is no need to scan at anything higher than 2400ppi since I wish only to print to 20×30″ and this is more than enough information to produce a downsized final export for my printer service. The filesize at 2400ppi is under 300Mb and this is reasonably fast to work with for spot removal etc.
 I have a naming convention for my exports which corresponds with my film logs. I use the very handy little film holder index tabs which imprint the negative to ensure I match the negative with my logs.
See Step 3- Setting EXIF information
 Next, I leave the Densitometer in default, it’s only there to inspect the prescan, and doesn’t make any scan modifications. It’s possible to make inspections and modify the Picture settings prior to scanning but so too, with the Picture Settings, I will take the scan into Lightroom and not use any adjustments here.
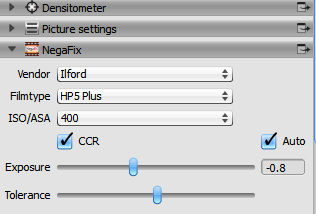
I set the Negafix to my film type and ISO. I do see a lot of benefit in using the Automatic Orange mask Expansion. I notice a definite improvement in sharpness without loss of definintion. I also leave Color Cast Removal ticked. But I do not adjust Exposure or Tolerance here.
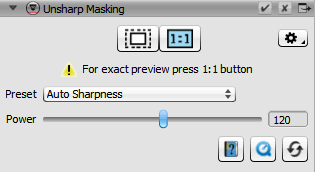 The Unsharp Masking also delivers good results. I have seen improvement but sometimes increasing the level from the default. But I certainly include this process in the scan by having the dialog open.
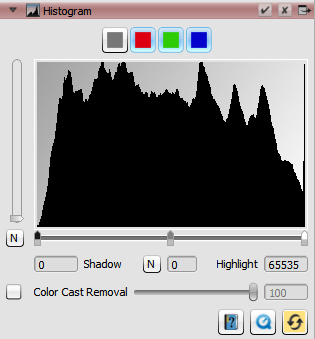 Finally, the histogram dialog. I include this in my dialogs but I have not had reason to use it yet. If the histogram showed any large areas being outside the range I would probably drag the left/right selectors back in towards the edges of the graph.
The use of iSRD (Dust Removal) in Silverfast is useless on B&W negatives, so don’t go there. I’m a bit puzzled why the software removes iSRD as an option if you already select B&W negative. But upon further reading I see people using so many alternative methods of scanning negatives and prints that it’s possible someone wants to scan a colour negative/transparency as if it’s B&W, in which case iSRD might work.